Sunday, July 29, 2012

Maternity Shirts made cute again!!

So I was done having kids and got rid of everything, only to have a little surprise as soon as I did!  Now I had to buy everything new again. (Darn, who likes buying a whole new wardrobe with a valid excuse!!!)  Someone gave me some maternity clothes but most of them were the really old shirts that, to me, looked like I was wearing a tent.  I honestly prefer ones that show off your belly a bit.  The shirts I was given were long enough (thank heavens) but way to baggy.  (My problem is I have such a long torso that I can't seem to find shirts that cover my whole belly, and not show the panel that the maternity shirts have) BUT, that wasn't going to stop me this time.  There was one shirt that I liked particularly.  I liked the fabric and pattern... but the shirt had issues.  It was a tent shirt:


Okay, so I'm not really that big and that far along, but I had to show how baggy it was.  I think you get the point.

I took me forever how to figure it out.  For one, the shirt was a little skiwampus to begin with... you can see what I mean above in one of the pictures.  But I tried it on inside out and pinned it where I wanted it to be:
Then, I sewed up the side of the shirt, before cutting anything off, and making sure everything was even on both sides.  (That took a bit, because the shirt was already shaped weird)  I should mention that after I sewed the inside of both sides, I put it on again, just to make sure it looked okay.  I am glad that I did because it looked funny.  Make sure you measure how far from your armpit you should start sewing, mine was off by quite a bit, so I had to unpick and resew.
*Not that I want to confuse anyone who might acutally want to try this, but I ended up cutting off the orignal seam and then pinning it and doing the sewing process over.  Like I have said the shirt was allready kind of off, the longer belly part was not centered. 

After I cut off the excess fabric I measured and cut the elastic to the length that I wanted it.  I sewed a tiny bit to the top (or maybe I pinned it) and then attached the bottom part of the elastic to the shirt, I think I did sew it, because my pin kept slipping.

Then I stretched it and sewed it to the shirt:


This was the hard part.  You kind of have to hold stretched out and then guide it through at the same time.

Once it is sewn it will be Ruched!!

Then you do it to the other side and you have a ruched shirt.  When I tried it on, I thought it still looked a bit funny, so I trimmed and hemmed up the bottom of the shirt a bit (so that it was more centered).
I then decided that I didn't like the sleeves- too long for me- so I ruched the sleeves a bit as well (after I cut and hemmed them a bit that is.)


I can't say that I love the shirt now, but it definitely looked a lot better. The best part was I didn't have to pay for another shirt, and it is now a bit more in style!
I still can't figure out what I want to do with the neck line, because it's not my favorite, but it will work!


Much better!!!


Yard Sale Signs

I am sure that everyone who might have ever thought about reading my little blog has given up on me.  My last post was in March.. that's almost 5 months ago.  Well, I guess I've had a bit of an excuse, I got pregnant with #6.  This wasn't planned, but it sure is welcome.  Especially since after having 5 boys, I think we are finally getting a little girl.  Think of all the cute things I get to make for her.  Now I really don't have an excuse not to post and keep up with my blog.
I have several things that I need to work on.  I've been asked to teach a small class on how to hem a pair of pants.  I think that is another great excuse for another post!

But like my title says, this is a blog about random bits of fabric.  mostly it will be about sewing and the like, but occasionally it will have my opinions and thoughts on life.  Today is one of those days.  You can choose to read my opinion on Yard Sale signs (or not).  I love to go yard sailing.. or how ever that is spelled.  It is something that I live for every Saturday morning when everyone is still in bed asleep and I don't have to be doing anything important.  My hubby doesn't work on Saturdays yet so I am taking advantage of this opportunity.
You'd be amazed at what I have found.  I found some really cute fabric and tons of cute clothes for my kids.  Yesterday I even found a Janie and Jack Sweater for .50!  That was a find, you never find Janie & Jack things at yard sales, well at least I don't.  (Janie & Jack is a line of clothing that is really expensive and way cute!)
Well, the yard sale signs.  There are so many signs that drive me crazy.  You can hardly read them until you pass them while driving.  In my opinion you need "YARD SALE" or what ever kind of sale you are having in big BOLD letters on a big bright sign.  To me, it's worth it to spend the $$ on a bright green or yellow poster board.  I always cut my poster board in half.  I also thing that you need a BIG arrow pointing in the direction that the sale is.  It needs to be in an obvious spot, and far enough away to give people time to drive and turn into the neighborhood.  Sometimes I think it's a good thing to have the address, but I am driving by so fast to not really have a chance to read it.  That's why the arrows on every turn is a great idea too.  I've been to so many that you turn into the neighborhood and then have no idea which way to go from there.  I hate driving around waisting gas looking for that elusive sale.  Another thing that bugs me, they have too much info on their sign to get a chance to read where it is.   The thing that bugs me most though is the fact that people are too lazy to go and clean up their signs when they are done.  I'm fine with having a million signs up, as long as they get taken down when they are done.
There's my 2 cents worth.  I can hop off of my soap box now.
Thanks for reading, and hopefully I'll have much more to show off later.

Sunday, March 4, 2012

It's been a while since I have updated, sorry. 
I have so many projects that I am working on and want to work on, but I just had to post a few pictures of the bibs that I finally finished.  I LOVE LOVE LOVE the fabric I picked and couldn't wait to start/finish them- that and my little Bugaboo really needed a few more bibs.
I love Riley Blake's Wheels, and I found some of the fabric at a fabric store- shocked because you can't find it anywhere any more I had to buy some.  But my only problem was I felt I couldn't justify the purchase unless I knew exactly what I was going to do with it, I already have so much fabric and if my Hubby asked why I bought it, I had to have a solid reason.  After much thought I went back to the fabric store and bought it to make some bibs, and other projects!!!!  Then I went back for more later because I wanted to get some other matching fabric, and I found the cutest turtle fabric ever.  Let me just say that I LOVED how it all turned out!

Well, apparently I don't know why it wont switch the picture the correct way, it's right in my computer, but it wont load correctly here- hummmm.  Well, I started out by picking some cars and appliqued them onto a towel:


Then I sewed around them, cut out some fabric to cover the back and made some binding for around it.  Turned out pretty darn cute.  The turtle bib was made from a towel I found at Target!!!  The Fabric is Robert Kaufman Urban Zoologie or something similar to that.  I can't wait to make more:


Here's the back of the bibs:


 I have plans and fabric to make another bib from Riley Blakes Scoot fabric- I can't wait to show that one off!!!

Friday, November 4, 2011

Halloween Costumes

One of my favorite things about Halloween is the costumes.  There is something about making my boys costumes, I LOVE it.  It truly brings me great joy to make something for my boys, there isn't much that you can make for boys to wear.. okay that may not be true... but I I have always loved to make costumes. 
I like to make them as realistic as possible.  I think that when it comes to sewing, I am a perfectionist.  There aren't many things that I want just perfect, but when it comes to my sewing, I love making it look as close to store bought or better as possible.  I love putting the details into it.
This year I only made 2 costumes, The Counts (the Lion) and Batmans (the Vampire) costumes.  I did however make every other costume except for my little Tigger's costume.


 Batman wanted to be a Vampire.  His costume was quite easy, just the cape and the white scarf had to be sewn.


The Count wanted to be a lion.  I spent all day working on it, and finished it just in time to go trick or treating.  I hurried through it, so don't look to closely and you will see a huge mistake (that bugs me every time I look at it.)


 Mario!  So he was going to be Pooh bear, but earlier that day he didn't want to wear it, and it didn't fit anymore.  Kids grow way to fast.  This was Batman's costume last year, so it was a little big on him, but it fit him surprisingly well.  Don't you just love his mustache?  (I painted it on using my mascara, since that's all I had to use.)


I made Robin Hoods costume several years ago.  I really like how it turned out.  He wanted to be a ghost, and I had this sheer fabric.  I cut a hole out for the head, made a hood and added it to the top part.  Then I used some plain white fabric, cut some holes in it and voila!!!

Tuesday, October 18, 2011

Halloween Pennent

I had to share this turtorial because I am going to share how cute my Halloween Pennant Turned out.
The picture just doesn't so it justice, but there you go:

So, be sure to check out this turtorial:
http://www.diaryofaquilter.com/2011/03/easy-buntingpennant-tutorial.html

Sunday, October 2, 2011

One of my Favorite Quilts

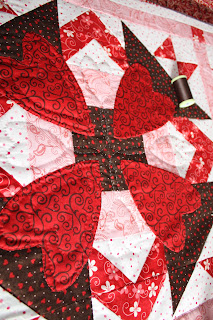
I have to show off one of my Favorite Quilts.   I want to give a little backround story on the quilt first.  I have always wanted to have a quilt for each season/Holiday and I have slowly started to find the "perfect" pattern for each one. 
Once I found the pattern, it takes me a while to find the perfect fabric. I found the pattern in a quilting magazine (For the Love of Quilting -Fons and Porter, I'll have to check out the exact magazine to tell you which one, which means I'll have to find it). I saw the fabric in a neighbors table runner and I just knew that it was what I wanted to do.  Most of the fabric was from Sandy Grevis L'Amour, One of them was from a Riley Blake line (can't remember the exact line off the top of my head though)
I Love etsy, this was yet again mostly purchased off of etsy!!!!!
I started this quilt at the beginning of a pregnancy (before I had my youngest Buggy Boo), it's amazing how much more I quilt and all of those creative juices start flowing when I am pregnant.  I guess it was a blessing in disguise that I miscarried- I had more "nesting" time!!!!
I started quilting the quilt during the last winter Olympics, as you will notice in my pictures!

I always get asked if I appliqued the hearts onto the quilt- yes I did.  Then I carefully hand sewed them into place before piecing the quilt together.
This quilt took a lot of time- but it was definitely worth it!


I love the detail in between the hearts


I never took a picture of the finished project... oops.  I'll have to do that when I think about it.

Friday, September 23, 2011

Ahhh!

I really need to figure out how to make my header a lot smaller.  It is driving me crazy, but I just don't know what else to try.
ANYWAYS....
I am determined to continue and keep up on my blogging, I have so many projects that I have either been working on, or plan on working on that I just can't wait to share them with who ever reads this lovely blog!
So, without much further ado (or however that is spelled)  this is the project that I have been working on for a l...o...n....g....... time.
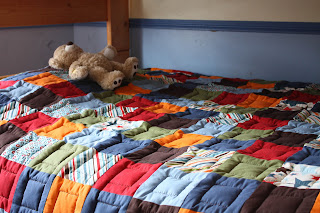
I started over a year ago.  I had this idea (okay okay, it's not really completely my idea. I saw a quilt in Mervyns that I loved, and thought "I could do that," it would be perfect for my boys' room!!!).  After seeing the quilt I looked at it several more times, and even drew my own pictureto remind me exactly what it was that I wanted to do.  I wish I didn't throw the picture away, I would have taken a picture to show you the beginning thought process.
With this idea in mind, I kept my eye out for the "perfect" fabric.  I knew that it had to be striped, and multi-colored.  It wasn't until my cousin pointed out how the Riley Blake All Star fabric is the perfect boy fabric, and that you could buy it on etsy.com that my wheels started turning.  It was indeed the perfect boy fabric, and the perfect fabric that I had been looking for:

Love the colors, the stripes and everything!  The first thing I bought was the backing of the quilts, because I knew that it would be the most expensive part, and because I thought I was just going to do solid colors on the front.  Well, if you are like me, that all changes as soon as you start thinking about what else you could do with the fabric (and I just loved the stars... there is something about stars!)
This is what I ended up buying for the rest of the quilts:
So my original plan was to just do solid colored squares on the front of the quilt, but I loved the other stars so much, that I had to accent with them as well. 
So, I started really making these when I was pregnant with my 5th son.  After the initial morning sickness stuff wears off, I get all crafty.  I loved to quilt, but I think it is amplified when I am pregnant.  This was one of many projects that I had going on when I was pregnant.  (I can't wait to show off what else I did!!)  I was determined to get this done by Christmas for my then youngest.  I sewed and quilted my little heart out, and Christmas Eve I finished the quilting part (thanks to many friends).  Thank heavens my little "Yoda" was only 2 and wouldn't know the difference if he got it for Christmas or for Easter.
I did however have some casualties while attempting this quilt:
I was not happy, but I did figure out how to make it work.  I had extra fabric, and ended up cutting off the ripped part, and sewing the extra on both sides to make it even.

The idea that I got from the quilt in Mervyns was this:
Stitching a square in the middle of the big square.  I used a piece of cardboard and traced it on the the fabric (you can kind of see part of the tracing on the light blue square).


(Like I said, I was making 2 quilts... did I mention that?)  I didn't finish both quilts in time for Christmas.  I honestly don't remember when I finished my little Yoda's quilt.  But I did:

Instead of binding the quilt, I just turned the fabric over the edge (it was all part of the plan....) and hand sewed in on.

I just finished quilting the 2nd quilt for my oldest (Robin Hood) yesterday.  I am quite pleased with how it turned out, and will post pictures when it is complete done!!!
Here's one more pic of the quilt on the bed.. (just because it is so cute!!!).